Java 2 Micro Edition (J2ME) combines a resource-constrained JVM and a set of Java APIs for developing applications for mobile devices. This article is the first in a series. This time, after a quick introduction to J2ME, I will provide a step-by-step guide to creating J2ME applications, also known as MIDlets, using a simple example. This will cover how to test and deploy these MIDlets as well. Finally, I will round out this installment with a look at the lifecycle of a MIDlet.
J2ME Introduction
What is J2ME? Cut away the hype and the excess fat and you are left with yet another (set of) Java APIs. Since these APIs cannot run on a traditional Java Virtual Machine (JVM), due to the limited size of mobile devices in regards to memory and resource availability, J2ME defines a limited version of the JVM as well. In a nutshell:
J2ME combines a resource constrained JVM and a set of Java APIs for developing applications for mobile devices.
Do you, as a developer, have to install this JVM and the APIs on mobile devices? No. Device manufacturers install and prepackage their devices with this JVM (and associated APIs). As a developer, you only need to develop applications targeting these devices and install them. Easier said than done!
J2ME can be divided into three parts, as shown in Figure 1: a configuration, a profile, and optional packages. A configuration contains the JVM (not the traditional JVM, but the cut-down version) and some class libraries; a profile builds on top of these base class libraries by providing a useful set of APIs; and optional packages, are well, an optional set of APIs that you may or may not use when creating your applications. Optional packages are traditionally not packaged by the device manufacturers, and you have to package and distribute them with your application. The configuration and profile are supplied by the device manufacturers and they embedded them in the devices.
he most popular profile and configuration that Sun provides are the Mobile Information Device Profile (MIDP) and Connected Limited Device Configuration (CLDC), respectively. As the name suggests, CLDC is for devices with limited configurations; for example, devices that have only 128 to 512KB of memory available for Java applications. Consequently, the JVM that it provides is very limited and supports only a small number of traditional Java classes. (This limited JVM is actually called the KVM.) Its counterpart, the Connected Device Configuration (CDC) is for devices with at least 2MB of memory available and supports a more feature-rich JVM (but still not a standard JVM).
The MID profile complements the CLDC configuration very well because it minimizes both the memory and power required for limited devices. It provides the basic API that is used for creating application for these devices. For example, it provides the javax.microedition.lcdui package that allows us to create the GUI elements that can be shown on a (limited) device running the MID profile on top of a CLDC configuration. Note that MIDP cannot be used with CDC devices. CDC devices get their own set of profiles, like the Foundation and Personal profiles. However, I will not cover these profiles or the CDC here, and will concentrate on using MIDP and CLDC only.
The latest versions of MIDP and CLDC are 2.0 and 1.1, respectively. Not many devices currently support these versions, but the list is growing rapidly. Sun maintains a list of devices according to version.
Acquiring and Installing the J2ME Development Kit
Getting started with developing applications (henceforth called "MIDlets") for the J2ME platform is easy. Although device manufacturers install and prepackage their devices with this JVM (and associated APIs), you still need to install the J2ME Wireless Toolkit 2.2 on your development machine. Before that, however, you must also have the Java Development Kit (JDK), version 1.4.2 or greater, installed.
Warning: I had problems getting the Wireless Toolkit to work properly with JDK 5.0. If you don't need the latest features in version 5.0, it is best to stick to any 1.4.2 version. I have used 1.4.2_05 for all examples in this series.
You need this Toolkit because it contains tools that are important in generating MIDlets. This Toolkit provides the development environment for the MIDP 2.0 and CLDC 1.1 (and for MIDP 1.0 and CLDC 1.0, since these parameters are backwards compatible), and it provides the optional packages required for the optional libraries, like 3D and Mobile Media applications. Lastly, it provides the ability to sign your MIDlets so that they can be authenticated before installation on a remote mobile device.
Once you download the installation package for the Toolkit, install it in the directory of your choice. The default, on Windows, is C:\WTK22, and this will be the installation directory for the examples in this series as well. I will not explain the directories created under this folder just now. Before I do that, let us try and understand the process of generating a MIDlet from scratch.
Pages: 1, 2, 3
Wednesday, December 5, 2007
Thursday, November 29, 2007
What is Ubuntu
What is Ubuntu?
Ubuntu is a community developed operating system that is perfect for laptops, desktops and servers. Whether you use it at home, at school or at work Ubuntu contains all the applications you'll ever need, from word processing and email applications, to web server software and programming tools.
Ubuntu is and always will be free of charge. You do not pay any licensing fees. You can download, use and share Ubuntu with your friends, family, school or business for absolutely nothing.
We issue a new desktop and server release every six months. That means you'll always have the the latest and greatest applications that the open source world has to offer.
Ubuntu is designed with security in mind. You get free security updates for at least 18 months on the desktop and server. With the Long Term Support (LTS) version you get three years support on the desktop, and five years on the server. There is no extra fee for the LTS version, we make our very best work available to everyone on the same free terms. Upgrades to new versions of Ubuntu are and always will be free of charge.
Everything you need on one CD, which provides a complete working environment. Additional software is available online.
The graphical installer enables you to get up and running quickly and easily. A standard installation should take less than 25 minutes.
Once installed your system is immediately ready-to-use. On the desktop you have a full set of productivity, internet, drawing and graphics applications, and games.
On the server you get just what you need to get up and running and nothing you don't.
Reference : http://www.ubuntu.com/products/whatisubuntu
Monday, November 26, 2007
Moontox Bro, ada hubungan apa ya sama rontokbro?
By: Hacker/Cracker Indonesia ]
---- Paraysutki #VM Community ----
[ SEND TO MALAYSIA/AUSTRALIA
Hentikanlah kebobrokan kalian --
Apa kalian tau rasanya menjadi manusia yang sia-sia?
Apa kalian tau rasanya setiap saat dihina dan tidak mampu merasakan kesenangan kalian?
Apa kalian tau betapa sakitnya kami (TKI) yang disiksa dan di perlakukan seperti binatang oleh majikan kalian? ditendang,dipukuli,dicaci maki,dihina,tidak digajih,dan pulang dengan anggota tubuh yg cacat? itulah yang kami dapatkan sehari-hari selama bekerja di sana
Aku yakin selama hidup kalian tidak pernah sedikitpun merasakan rasa sakit itu?
Wahai kalian yang ada di bumi ini
Kalian yang telah memojokanku dan Kalian yang telah merusak semua kesenanganku
Kalian hanya melihatku sebagai anak yang menyedihkan yang harus kalian singkirkan
kalian hanya memberiku satu-satunya jalan untuk membalas keputusan yang telah kalian buat
...Terima kasih...
kini kalian akan melihat darah di kedua tanganmu yang tak akan pernah bisa di bersihkan
dan kini aku akan hadir membangkitkan generasi yang lemah dan tak berdaya untuk melawan
!!! Bangkitlah Indonesia Raya, Bangsa dan Tanah Airku !!!
Itulah sebuah pesan yang berasal dari virus baru "Moontox Bro". Info lebih lengkapnya baca di sini. Melihat nama virus ini, jadi inget sama virus yang beberapa waktu lalu sempat ngetrend karena merepotkan semua orang, rontokbro. Apa ya hubungan mereka berdua?
Gak penting apa hubungan mereka berdua. Tapi yang jelas, kalo aku ngeliat dari vaksin.com, virus ini lebih berbahaya dibandingkan rontokbro. Kenapa aku bilang demikian? Karena di dalam keterangan vaksin.com, virus ini akan memformat semua partisi harddisk kecuali C:. bahaya bukan?
Kalo dilihat dari pesan yang ada di atas, virus ini berisi kecaman kepada Australia dan Malaysia yang telah berbuat semena-mena. Tapi sungguh aneh, kalo memang tujuannya untuk itu, kenapa virus ini disebarkan di Indonesia? Kenapa tidak disebarkan "hanya" di ke2 negara itu saja?
Btw, udah ada yang kena virus ini belum ya? Mudah2an seh belum ada. Oke, seperti kata pepatah lebih baik mencegah daripada mengobati. Sebelum virus menyerang, ada baiknya kita mencegahnya terlebih dahulu. Apa langkah-langkah yang harus dilakukan?
1. Matikan fasilitas autorun karena virus ini akan menyebar via USB.
2. Cegah file virus agar tidak bisa dieksekusi. Caranya : masuk ke Run -> gpedit.msc.
Akan muncul window Group Policy.


Kemudian masuk ke menu User Configuration -> Administrative Templates -> System. Kemudian di sebelah kanan ada list. Klik 2 kali pada tulisan. "Don't run Specified Windows application". Pilih "Enabled" dan klik tombol "Show". Klik tombol Add dan akan muncul sebuah window baru. Masukkan string Baca_Gue_Goblok.bat. Klik tombol OK. Lakukan hal yang sama untuk string Send To Hell.vbs dan juga Baca_GUe_Goblok.cmd.
Sesudah langkah-langkah di atas diikuti, selanjutnya tinggal berdoa aja. Mudah2an virus tidak akan menjangkiti komputer Anda. amin........
Wednesday, November 21, 2007
Antivirus Mahadewa.dll.vbs
bagi yang membutuhkan antivurs untuk mahadewa, silahkan download di
http://groups.yahoo.com/group/virus-collector/files/CleanMaHaDeWa.exe
. Bagi yang mau virusnya silahkan download di http://groups.yahoo.com/group/virus-collector/files/VBS_MaHaDeWa.zip.
makasih untuk mas Harnanto, yang sudah membuat antivirus ini seperti yang ada di blog saya juga. http://away.blogsome.com/2006/11/25/virus-harus-dibasmi/#comment-445
Setelah saya coba, antivirus ini lumayan mujarab. Hanya saja Computer Name dan Organization berubah PJS atau PJB gitu. Tapi gak apa-apa. Bagus koq.... Kalo mau ubah computer name dan organization silakan masuk ke gpedit.msc aja.
Friday, November 16, 2007
Setting Up Your E-mail in Microsoft Outlook
This tutorial shows you how to set up Microsoft Outlook to work with your e-mail account. This tutorial focuses on setting up Microsoft Outlook 2003, but these settings are similar in other versions of Microsoft Outlook. You can set up previous versions of Microsoft Outlook by using the settings in this tutorial.
To Set Up Your E-mail Account in Microsoft Outlook
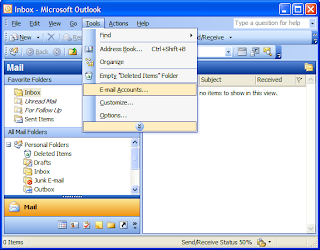
1. In Microsoft Outlook, select Tools > E-mail Accounts.
2. On the E-mail Accounts wizard window, select "Add a new e-mail account" and click Next.

3. For your server type, select "POP3" and click Next.

4. # On the Internet E-mail Settings (POP3) window, enter your information as follows:
Your Name
Enter your first and last name.
E-mail Address
Enter your e-mail address.
User Name
Enter your e-mail address, again.
Password
Enter the password you set up for your e-mail account.
Incoming mail server (POP3)
Enter pop.secureserver.net for your incoming mail server.
Outgoing mail server (SMTP)
Enter smtpout.secureserver.net for your outgoing mail server.
Click "More Settings."

5. On the Internet E-mail Settings window, select the "Outgoing Server" tab.
6. Select "My outgoing server (SMTP) requires authentication."
7. If you did not change the SMTP relay section, select "Use same settings as my incoming mail server". If you changed the user name and password in the SMTP relay section of your Manage Email Accounts page, select "Log on using" and enter the user name and password. The following example assumes you did not change your SMTP relay section in your Manage Email Accounts page.

8. Select the "Advanced" tab and change the "Outgoing server (SMTP)" port to 80 or 3535.
9. Click OK

10. Click Next.
11. Click Finish

To Set Up Your E-mail Account in Microsoft Outlook
1. In Microsoft Outlook, select Tools > E-mail Accounts.

2. On the E-mail Accounts wizard window, select "Add a new e-mail account" and click Next.
3. For your server type, select "POP3" and click Next.
4. # On the Internet E-mail Settings (POP3) window, enter your information as follows:
Your Name
Enter your first and last name.
E-mail Address
Enter your e-mail address.
User Name
Enter your e-mail address, again.
Password
Enter the password you set up for your e-mail account.
Incoming mail server (POP3)
Enter pop.secureserver.net for your incoming mail server.
Outgoing mail server (SMTP)
Enter smtpout.secureserver.net for your outgoing mail server.
Click "More Settings."
NOTE: "smtpout.secureserver.net" is an SMTP relay server. In order to use this server to send e-mails, you must first activate SMTP relay on your e-mail account. Log on to your Manage Email Accounts page to set up SMTP relay. If you do not have SMTP relay set up and your Internet Service Provider (ISP) allows it, you can use the outgoing mail server for your Internet Service Provider. Contact your Internet Service Provider to get this setting.
5. On the Internet E-mail Settings window, select the "Outgoing Server" tab.
6. Select "My outgoing server (SMTP) requires authentication."
7. If you did not change the SMTP relay section, select "Use same settings as my incoming mail server". If you changed the user name and password in the SMTP relay section of your Manage Email Accounts page, select "Log on using" and enter the user name and password. The following example assumes you did not change your SMTP relay section in your Manage Email Accounts page.
8. Select the "Advanced" tab and change the "Outgoing server (SMTP)" port to 80 or 3535.
9. Click OK
10. Click Next.
11. Click Finish
Monday, November 5, 2007
SELECT Syntax MySQL
SELECT
    [ALL | DISTINCT | DISTINCTROW ]
      [HIGH_PRIORITY]
      [STRAIGHT_JOIN]
      [SQL_SMALL_RESULT] [SQL_BIG_RESULT] [SQL_BUFFER_RESULT]
      [SQL_CACHE | SQL_NO_CACHE] [SQL_CALC_FOUND_ROWS]
    select_expr, ...
    [FROM table_references
    [WHERE where_condition]
    [GROUP BY {col_name | expr | position}
      [ASC | DESC], ... [WITH ROLLUP]]
    [HAVING where_condition]
    [ORDER BY {col_name | expr | position}
      [ASC | DESC], ...]
    [LIMIT {[offset,] row_count | row_count OFFSET offset}]
    [PROCEDURE procedure_name(argument_list)]
    [INTO OUTFILE 'file_name' export_options
      | INTO DUMPFILE 'file_name'
      | INTO var_name [, var_name]]
    [FOR UPDATE | LOCK IN SHARE MODE]]
SELECT is used to retrieve rows selected from one or more tables, and can include UNION statements and subqueries. See Section 12.2.7.3, “UNION Syntax”, and Section 12.2.8, “Subquery Syntax”.
The most commonly used clauses of SELECT statements are these:
*
Each select_expr indicates a column that you want to retrieve. There must be at least one select_expr.
*
table_references indicates the table or tables from which to retrieve rows. Its syntax is described in Section 12.2.7.1, “JOIN Syntax”.
*
The WHERE clause, if given, indicates the condition or conditions that rows must satisfy to be selected. where_condition is an expression that evaluates to true for each row to be selected. The statement selects all rows if there is no WHERE clause.
In the WHERE clause, you can use any of the functions and operators that MySQL supports, except for aggregate (summary) functions. See Chapter 11, Functions and Operators.
SELECT can also be used to retrieve rows computed without reference to any table.
For example:
mysql> SELECT 1 + 1;
-> 2
You are allowed to specify DUAL as a dummy table name in situations where no tables are referenced:
mysql> SELECT 1 + 1 FROM DUAL;
-> 2
DUAL is purely for the convenience of people who require that all SELECT statements should have FROM and possibly other clauses. MySQL may ignore the clauses. MySQL does not require FROM DUAL if no tables are referenced.
In general, clauses used must be given in exactly the order shown in the syntax description. For example, a HAVING clause must come after any GROUP BY clause and before any ORDER BY clause. The exception is that the INTO clause can appear either as shown in the syntax description or immediately preceding the FROM clause.
*
A select_expr can be given an alias using AS alias_name. The alias is used as the expression's column name and can be used in GROUP BY, ORDER BY, or HAVING clauses. For example:
SELECT CONCAT(last_name,', ',first_name) AS full_name
FROM mytable ORDER BY full_name;
The AS keyword is optional when aliasing a select_expr. The preceding example could have been written like this:
SELECT CONCAT(last_name,', ',first_name) full_name
FROM mytable ORDER BY full_name;
However, because the AS is optional, a subtle problem can occur if you forget the comma between two select_expr expressions: MySQL interprets the second as an alias name. For example, in the following statement, columnb is treated as an alias name:
SELECT columna columnb FROM mytable;
For this reason, it is good practice to be in the habit of using AS explicitly when specifying column aliases.
*
It is not allowable to use a column alias in a WHERE clause, because the column value might not yet be determined when the WHERE clause is executed. See Section B.1.5.4, “Problems with Column Aliases”.
*
The FROM table_references clause indicates the table or tables from which to retrieve rows. If you name more than one table, you are performing a join. For information on join syntax, see Section 12.2.7.1, “JOIN Syntax”. For each table specified, you can optionally specify an alias.
tbl_name [[AS] alias] [index_hint]
The use of index hints provides the optimizer with information about how to choose indexes during query processing. For a description of the syntax for specifying these hints, see Section 12.2.7.2, “Index Hint Syntax”.
You can use SET max_seeks_for_key=value as an alternative way to force MySQL to prefer key scans instead of table scans. See Section 5.2.3, “System Variables”.
*
You can refer to a table within the default database as tbl_name, or as db_name.tbl_name to specify a database explicitly. You can refer to a column as col_name, tbl_name.col_name, or db_name.tbl_name.col_name. You need not specify a tbl_name or db_name.tbl_name prefix for a column reference unless the reference would be ambiguous. See Section 8.2.1, “Identifier Qualifiers”, for examples of ambiguity that require the more explicit column reference forms.
*
A table reference can be aliased using tbl_name AS alias_name or tbl_name alias_name:
SELECT t1.name, t2.salary FROM employee AS t1, info AS t2
WHERE t1.name = t2.name;
SELECT t1.name, t2.salary FROM employee t1, info t2
WHERE t1.name = t2.name;
*
Columns selected for output can be referred to in ORDER BY and GROUP BY clauses using column names, column aliases, or column positions. Column positions are integers and begin with 1:
SELECT college, region, seed FROM tournament
ORDER BY region, seed;
SELECT college, region AS r, seed AS s FROM tournament
ORDER BY r, s;
SELECT college, region, seed FROM tournament
ORDER BY 2, 3;
To sort in reverse order, add the DESC (descending) keyword to the name of the column in the ORDER BY clause that you are sorting by. The default is ascending order; this can be specified explicitly using the ASC keyword.
If ORDER BY occurs within a subquery and also is applied in the outer query, the outermost ORDER BY takes precedence. For example, results for the following statement are sorted in descending order, not ascending order:
(SELECT ... ORDER BY a) ORDER BY a DESC;
Use of column positions is deprecated because the syntax has been removed from the SQL standard.
*
If you use GROUP BY, output rows are sorted according to the GROUP BY columns as if you had an ORDER BY for the same columns. To avoid the overhead of sorting that GROUP BY produces, add ORDER BY NULL:
SELECT a, COUNT(b) FROM test_table GROUP BY a ORDER BY NULL;
*
MySQL extends the GROUP BY clause so that you can also specify ASC and DESC after columns named in the clause:
SELECT a, COUNT(b) FROM test_table GROUP BY a DESC;
*
MySQL extends the use of GROUP BY to allow selecting fields that are not mentioned in the GROUP BY clause. If you are not getting the results that you expect from your query, please read the description of GROUP BY found in Section 11.11, “Functions and Modifiers for Use with GROUP BY Clauses”.
*
GROUP BY allows a WITH ROLLUP modifier. See Section 11.11.2, “GROUP BY Modifiers”.
*
The HAVING clause is applied nearly last, just before items are sent to the client, with no optimization. (LIMIT is applied after HAVING.)
A HAVING clause can refer to any column or alias named in a select_expr in the SELECT list or in outer subqueries, and to aggregate functions. However, the SQL standard requires that HAVING must reference only columns in the GROUP BY clause or columns used in aggregate functions. To accommodate both standard SQL and the MySQL-specific behavior of being able to refer columns in the SELECT list, MySQL 5.0.2 and up allows HAVING to refer to columns in the SELECT list, columns in the GROUP BY clause, columns in outer subqueries, and to aggregate functions.
For example, the following statement works in MySQL 5.0.2 but produces an error for earlier versions:
mysql> SELECT COUNT(*) FROM t GROUP BY col1 HAVING col1 = 2;
If the HAVING clause refers to a column that is ambiguous, a warning occurs. In the following statement, col2 is ambiguous because it is used as both an alias and a column name:
SELECT COUNT(col1) AS col2 FROM t GROUP BY col2 HAVING col2 = 2;
Preference is given to standard SQL behavior, so if a HAVING column name is used both in GROUP BY and as an aliased column in the output column list, preference is given to the column in the GROUP BY column.
*
Do not use HAVING for items that should be in the WHERE clause. For example, do not write the following:
SELECT col_name FROM tbl_name HAVING col_name > 0;
Write this instead:
SELECT col_name FROM tbl_name WHERE col_name > 0;
*
The HAVING clause can refer to aggregate functions, which the WHERE clause cannot:
SELECT user, MAX(salary) FROM users
GROUP BY user HAVING MAX(salary) > 10;
(This did not work in some older versions of MySQL.)
*
MySQL allows duplicate column names. That is, there can be more than one select_expr with the same name. This is an extension to standard SQL. Because MySQL also allows GROUP BY and HAVING to refer to select_expr values, this can result in an ambiguity:
SELECT 12 AS a, a FROM t GROUP BY a;
In that statement, both columns have the name a. To ensure that the correct column is used for grouping, use different names for each select_expr.
*
MySQL resolves unqualified column or alias references in ORDER BY clauses by searching in the select_expr values, then in the columns of the tables in the FROM clause. For GROUP BY or HAVING clauses, it searches the FROM clause before searching in the select_expr values. (For GROUP BY and HAVING, this differs from the pre-MySQL 5.0 behavior that used the same rules as for ORDER BY.)
*
The LIMIT clause can be used to constrain the number of rows returned by the SELECT statement. LIMIT takes one or two numeric arguments, which must both be non-negative integer constants (except when using prepared statements).
With two arguments, the first argument specifies the offset of the first row to return, and the second specifies the maximum number of rows to return. The offset of the initial row is 0 (not 1):
SELECT * FROM tbl LIMIT 5,10; # Retrieve rows 6-15
To retrieve all rows from a certain offset up to the end of the result set, you can use some large number for the second parameter. This statement retrieves all rows from the 96th row to the last:
SELECT * FROM tbl LIMIT 95,18446744073709551615;
With one argument, the value specifies the number of rows to return from the beginning of the result set:
SELECT * FROM tbl LIMIT 5; # Retrieve first 5 rows
In other words, LIMIT row_count is equivalent to LIMIT 0, row_count.
For prepared statements, you can use placeholders (supported as of MySQL version 5.0.7). The following statements will return one row from the tbl table:
SET @a=1;
PREPARE STMT FROM 'SELECT * FROM tbl LIMIT ?';
EXECUTE STMT USING @a;
The following statements will return the second to sixth row from the tbl table:
SET @skip=1; SET @numrows=5;
PREPARE STMT FROM 'SELECT * FROM tbl LIMIT ?, ?';
EXECUTE STMT USING @skip, @numrows;
For compatibility with PostgreSQL, MySQL also supports the LIMIT row_count OFFSET offset syntax.
If LIMIT occurs within a subquery and also is applied in the outer query, the outermost LIMIT takes precedence. For example, the following statement produces two rows, not one:
(SELECT ... LIMIT 1) LIMIT 2;
*
The SELECT ... INTO OUTFILE 'file_name' form of SELECT writes the selected rows to a file. The file is created on the server host, so you must have the FILE privilege to use this syntax. file_name cannot be an existing file, which among other things prevents files such as /etc/passwd and database tables from being destroyed. As of MySQL 5.0.19, the character_set_filesystem system variable controls the interpretation of the filename.
The SELECT ... INTO OUTFILE statement is intended primarily to let you very quickly dump a table to a text file on the server machine. If you want to create the resulting file on some client host other than the server host, you cannot use SELECT ... INTO OUTFILE. In that case, you should instead use a command such as mysql -e "SELECT ..." > file_name to generate the file on the client host.
SELECT ... INTO OUTFILE is the complement of LOAD DATA INFILE; the syntax for the export_options part of the statement consists of the same FIELDS and LINES clauses that are used with the LOAD DATA INFILE statement. See Section 12.2.5, “LOAD DATA INFILE Syntax”.
FIELDS ESCAPED BY controls how to write special characters. If the FIELDS ESCAPED BY character is not empty, it is used as a prefix that precedes following characters on output:
o
The FIELDS ESCAPED BY character
o
The FIELDS [OPTIONALLY] ENCLOSED BY character
o
The first character of the FIELDS TERMINATED BY and LINES TERMINATED BY values
o
ASCII NUL (the zero-valued byte; what is actually written following the escape character is ASCII “0”, not a zero-valued byte)
The FIELDS TERMINATED BY, ENCLOSED BY, ESCAPED BY, or LINES TERMINATED BY characters must be escaped so that you can read the file back in reliably. ASCII NUL is escaped to make it easier to view with some pagers.
The resulting file does not have to conform to SQL syntax, so nothing else need be escaped.
If the FIELDS ESCAPED BY character is empty, no characters are escaped and NULL is output as NULL, not \N. It is probably not a good idea to specify an empty escape character, particularly if field values in your data contain any of the characters in the list just given.
Here is an example that produces a file in the comma-separated values (CSV) format used by many programs:
SELECT a,b,a+b INTO OUTFILE '/tmp/result.txt'
FIELDS TERMINATED BY ',' OPTIONALLY ENCLOSED BY '"'
LINES TERMINATED BY '\n'
FROM test_table;
*
If you use INTO DUMPFILE instead of INTO OUTFILE, MySQL writes only one row into the file, without any column or line termination and without performing any escape processing. This is useful if you want to store a BLOB value in a file.
*
The INTO clause can name a list of one or more variables, which can be user-defined variables, or parameters or local variables within a stored function or procedure body. The selected values are assigned to the variables. The number of variables must match the number of columns.
Within a stored routine, the variables can be routine parameters or local variables. See Section 18.2.7.3, “SELECT ... INTO Statement”.
*
Note
Any file created by INTO OUTFILE or INTO DUMPFILE is writable by all users on the server host. The reason for this is that the MySQL server cannot create a file that is owned by anyone other than the user under whose account it is running. (You should never run mysqld as root for this and other reasons.) The file thus must be world-writable so that you can manipulate its contents.
*
The SELECT syntax description at the beginning this section shows the INTO clause near the end of the statement. It is also possible to use INTO OUTFILE or INTO DUMPFILE immediately preceding the FROM clause.
*
A PROCEDURE clause names a procedure that should process the data in the result set. For an example, see Section 26.3.1, “Procedure Analyse”.
*
If you use FOR UPDATE with a storage engine that uses page or row locks, rows examined by the query are write-locked until the end of the current transaction. Using LOCK IN SHARE MODE sets a shared lock that allows other transactions to read the examined rows but not to update or delete them. See Section 13.2.10.5, “SELECT ... FOR UPDATE and SELECT ... LOCK IN SHARE MODE Locking Reads”.
Following the SELECT keyword, you can use a number of options that affect the operation of the statement.
The ALL, DISTINCT, and DISTINCTROW options specify whether duplicate rows should be returned. If none of these options are given, the default is ALL (all matching rows are returned). DISTINCT and DISTINCTROW are synonyms and specify removal of duplicate rows from the result set.
HIGH_PRIORITY, STRAIGHT_JOIN, and options beginning with SQL_ are MySQL extensions to standard SQL.
*
HIGH_PRIORITY gives the SELECT higher priority than a statement that updates a table. You should use this only for queries that are very fast and must be done at once. A SELECT HIGH_PRIORITY query that is issued while the table is locked for reading runs even if there is an update statement waiting for the table to be free. This affects only storage engines that use only table-level locking (MyISAM, MEMORY, MERGE).
HIGH_PRIORITY cannot be used with SELECT statements that are part of a UNION.
*
STRAIGHT_JOIN forces the optimizer to join the tables in the order in which they are listed in the FROM clause. You can use this to speed up a query if the optimizer joins the tables in non-optimal order. See Section 6.2.1, “Optimizing Queries with EXPLAIN”. STRAIGHT_JOIN also can be used in the table_references list. See Section 12.2.7.1, “JOIN Syntax”.
*
SQL_BIG_RESULT can be used with GROUP BY or DISTINCT to tell the optimizer that the result set has many rows. In this case, MySQL directly uses disk-based temporary tables if needed, and prefers sorting to using a temporary table with a key on the GROUP BY elements.
*
SQL_BUFFER_RESULT forces the result to be put into a temporary table. This helps MySQL free the table locks early and helps in cases where it takes a long time to send the result set to the client.
*
SQL_SMALL_RESULT can be used with GROUP BY or DISTINCT to tell the optimizer that the result set is small. In this case, MySQL uses fast temporary tables to store the resulting table instead of using sorting. This should not normally be needed.
*
SQL_CALC_FOUND_ROWS tells MySQL to calculate how many rows there would be in the result set, disregarding any LIMIT clause. The number of rows can then be retrieved with SELECT FOUND_ROWS(). See Section 11.10.3, “Information Functions”.
*
SQL_CACHE tells MySQL to store the query result in the query cache if you are using a query_cache_type value of 2 or DEMAND. For a query that uses UNION or subqueries, this option effects any SELECT in the query. See Section 6.5.4, “The MySQL Query Cache”.
*
SQL_NO_CACHE tells MySQL not to store the query result in the query cache. See Section 6.5.4, “The MySQL Query Cache”. For a query that uses UNION or subqueries, this option effects any SELECT in the query.
Wednesday, October 31, 2007
What is favicon.cio
Favicon is the acronym for ‘Favorites Icon’. The small image displayed at the beginning of the URL bar or address bar of browser is known as the Favicon. That icon is nothing but the small symbol of the whole web page or the site and thus is also known as the pageicon or urlicon.
Creating favicon.ico :
1. Create an image of 16×16 pixels.
2. Save that image as ‘favicon.ico’ .
Placing or Uploading favicon.ico :
Favicon.ico file must be uploaded under the root directory of the web server so that it is automatically displayed on the address bar. And if the favicon.ico is not uploaded in the root directory the developer will have to specify a tag in section of the web page for locating that icon.
<link rel=”shortcut icon” xhref=”/favicon.ico” type=”image/x-icon” />
For XHTML, the link element must be terminated by ” />” instead of “>”.
Give specific path to href attribute so that the favicon.ico will get located.
Most of the browsers available read the faicon.ico file format correctly and thus easily displays the icon in the URL bar. However, now some browsers also support animated GIF and PNG image formats. Older versions of IE dont display this favicon; but now the newer versions support favicons.
Advantages and Limitations of favicon.ico :
The important advantage of using favicon is to make your Favorites entry easier to find. But Favicon also has limitations. Only newer versions of IE shows icon in the Favorites listings as well as in the address bar. While netscape and opera use it only in the address bar and not in the bookmarks list. Also, the icon disappears when the browser cache is emptied.
Friday, October 26, 2007
Fungsi PHP untuk menghitung umur
Umur seseorang dihitung berdasarkan perbedaan tanggal lahirnya dengan tanggal sekarang. Kali ini saya akan memberikan fungsi PHP untuk menghitung umur.
//sebuah function dengan nama hitUmur dan sebuah parameter
function hitUmur($tgllahir) {
        $tgl = explode("-", $tgllahir);
       // memecah $tgllahir yang tadinya YYYY-MM-DD menjadi array
      // $tgl[0] = tahun (YYYY)
     //  $tgl[a] = bulan (MM)
    // $tgl[2] = hari (DD)

        $umur = date("Y") - $tgl[0];  //ini untuk ngitung umurnya

        if(($tgl[1] > date("m")) || ($tgl[1] == date("m") && date("d") < $tgl[2])) //ngecek apakah tgl lahir dan bulannya belum lewat?
        {

                $umur -= 1;
        }
        return $umur;
}

//cara mengakses fungsi
$tgllahirku = "1980-10-12";
echo hitUmur($tgllahirku);
?>
Wednesday, October 3, 2007
Instalasi PHP, APACHE, MYSQL
bagi anda yang mau instalasi php, apache dan mysql satu-persatu. Bisa diwonload tutorialnya di sini. Tutorial berbentuk file swf....
1. Untuk instalasi di Windows, http://www.megaupload.com/?d=28V56YG8
2. Untuk instalasi di Linux, http://www.megaupload.com/?d=OGGHZH6S
Semoga tutorial di atas dapat membantu.....
1. Untuk instalasi di Windows, http://www.megaupload.com/?d=28V56YG8
2. Untuk instalasi di Linux, http://www.megaupload.com/?d=OGGHZH6S
Semoga tutorial di atas dapat membantu.....
Wednesday, September 26, 2007
Membasmi virus mahadewa labkom ubl
Belakangan ini banyak rekan-rekan yang berkunjung ke blog saya yang lainnya dan mereka komplain karena komputernya terkena virus mahadewa labkom ubl. Karena itu akan saya berikan cara untuk menghilangkan virus tsb. Ada 2 cara untuk menghilangkan virus tsb.
1. Dengan menggunakan antivirus
Gunakan antivirus ansav yang dapat didownload melalui situs www.ansav.com.
2. Manual
Antivirus memang bisa membersihkan virus tsb, akan tetapi virus tersebut akan masuk ke registry windows kita. Nah, untuk membersihkannya, silakan masuk ke registry. Yaitu dengan menekan Start->Run kemudian ketik regedit.
Sebelum masuk ke regedit, matikan proses wscript.exe yang sedang berjalan melalui task manager. Cara masuk ke task manager yaitu dengan cara Start->Run kemudian ketik taskmgr. Matikan proses yang bernama wscript.exe.
Langkah selanjutnya adalah masuk ke gpedit. Tujuannya adalah untuk mencegah virus kembali berjalan. Cara masuk ke gpedit yaitu dengan cara Start->Run kemudian ketik gpedit.msc. Setelah gpedit muncul, pilih menu user configuration->administrative template->system. Pada jendela yang ada di sampingnya, pilih menu don't run specified windows application dengan cara mengklik 2 kali. Pilih combo box enable. Masukkan wscript.exe, MaHaDeWa.vbs. dll, WinXp.vbs pada textbox yang tersedia.
Selanjutnya bersihkan file induk virus.
a. Hapus file WinXp.vbs di c:\windows\
b. Hapus file MaHaDeWa.vbs.dll di c:\windows\system32
Setelah file indek terhapus, selanjutnya tinggal membersihkan registry. Buka regedit dengan cara Start->Run ketik regedit.
Cari string dalam registry yang mengandung kata mahadewa. CAranya tekan CTRL+F kemudian ketik mahadewa. Hapus deh semua string yang mengandung kata mahadewa...
Semoga virus mahadewa hilang dari komputer Anda dan tidak kembali lagi...
Semoga artikel ini bisa membantu rekan-rekan yang kesulitan akibat virus mahadewa
Thursday, September 20, 2007
How To Enable Autorun for Other Removable Media
How To Enable Autorun for Other Removable Media
Autorun can be enabled or disabled for all Removable media types, such as a floppy or Zip disk. Windows systems are configured to enable CD Notification, other removable media are by default disabled.
The System Properties User interface only exposes the CD Enable or Disable selection. The setting reflected in this dialog makes an entry in the System Registry. It is in this same location that other media types are configured.
Notes:
1. Modifiying the Registry is not for the inexperienced user. Anyone will tell you, be VERY careful.
2. The modifications made in this case use Hex not Decimal numbers. If you are unfamiliar with the Registry or the characteristics of base numbering and Hex, studying these topics prior to making these modifications is advisable.
To Modify these Registry Settings, Use Regedit and navigate to the following Key:
HKEY_CURRENT_USER
Software
Microsoft
Windows
CurrentVersion
Policies
Explorer
"NoDriveTypeAutoRun"
The default value for the setting is 95 0 0 0. Change the first byte to 91. Restart the computer to make the new setting take effect. You may have to right-click on the floppy and choose AutoPlay from the menu to see the AutoPlay behavior.
Wednesday, September 19, 2007
Using ADOdb with PHP and Oracle: an advanced tutorial
1. Introduction
Oracle is the most popular commercial database used with PHP. There are many ways of accessing Oracle databases in PHP. These include:
* The oracle extension
* The oci8 extension
* PEAR DB library
* ADOdb library
The wide range of choices is confusing to someone just starting with Oracle and PHP. I will briefly summarize the differences, and show you the advantages of using ADOdb.
First we have the C extensions which provide low-level access to Oracle functionality. These C extensions are precompiled into PHP, or linked in dynamically when the web server starts up. Just in case you need it, here's a guide to installing Oracle and PHP on Linux.
Oracle extension Designed for Oracle 7 or earlier. This is obsolete.
Oci8 extension Despite it's name, which implies it is only for Oracle 8i, this is the standard method for accessing databases running Oracle 8i, 9i or 10g (and later).
Here is an example of using the oci8 extension to query the emp table of the scott schema with bind parameters:
$conn = OCILogon("scott","tiger", $tnsName);
$stmt = OCIParse($conn,"select * from emp where empno > :emp order by empno");
$emp = 7900;
OCIBindByName($stmt, ':emp', $emp);
$ok = OCIExecute($stmt);
while (OCIFetchInto($stmt,$arr)) {
print_r($arr);
echo "
";
}
This generates the following output:
Array ( [0] => 7902 [1] => FORD [2] => ANALYST [3] => 7566 [4] => 03/DEC/81 [5] => 3000 [7] => 20 ) Array ( [0] => 7934 [1] => MILLER [2] => CLERK [3] => 7782 [4] => 23/JAN/82 [5] => 1300 [7] => 10 )
We also have many higher level PHP libraries that allow you to simplify the above code. The most popular are PEAR DB and ADOdb. Here are some of the differences between these libraries:
Feature PEAR DB 1.6 ADOdb 4.52
General Style Simple, easy to use. Lacks Oracle specific functionality. Has multi-tier design. Simple high-level design for beginners, and also lower-level advanced Oracle functionality.
Support for Prepare Yes, but only on one statement, as the last prepare overwrites previous prepares. Yes (multiple simultaneous prepare's allowed)
Support for LOBs No Yes, using update semantics
Support for REF Cursors No Yes
Support for IN Parameters Yes Yes
Support for OUT Parameters No Yes
Schema creation using XML No Yes, including ability to define tablespaces and constraints
Provides database portability features No Yes, has some ability to abstract features that differ between databases such as dates, bind parameters, and data types.
Performance monitoring and tracing No Yes. SQL can be traced and linked to web page it was executed on. Explain plan support included.
Recordset caching for frequently used queries No Yes. Provides great speedups for SQL involving complex where, group-by and order-by clauses.
Popularity Yes, part of PEAR release Yes, many open source projects are using this software, including PostNuke, Xaraya, Mambo, Tiki Wiki.
Speed Medium speed. Very high speed. Fastest database abstraction library available for PHP. Benchmarks are available.
High Speed Extension available No Yes. You can install the optional ADOdb extension, which reimplements the most frequently used parts of ADOdb as fast C code. Note that the source code version of ADOdb runs just fine without this extension, and only makes use of the extension if detected.
PEAR DB is good enough for simple web apps. But if you need more power, you can see ADOdb offers more sophisticated functionality. The rest of this article will concentrate on using ADOdb with Oracle. You can find out more about connecting to Oracle later in this guide.
ADOdb Example
In ADOdb, the above oci8 example querying the emp table could be written as:
include "/path/to/adodb.inc.php";
$db = NewADOConnection("oci8");
$db->Connect($tnsName, "scott", "tiger");
$rs = $db->Execute("select * from emp where empno>:emp order by empno",
array('emp' => 7900));
while ($arr = $rs->FetchRow()) {
print_r($arr);
echo "
";
}
The Execute( ) function returns a recordset object, and you can retrieve the rows returned using $recordset->FetchRow( ).
If we ignore the initial connection preamble, we can see the ADOdb version is much easier and simpler:
Oci8 ADOdb
$stmt = OCIParse($conn,
"select * from emp where empno > :emp");
$emp = 7900;
OCIBindByName($stmt, ':emp', $emp);
$ok = OCIExecute($stmt);
while (OCIFetchInto($stmt,$arr)) {
print_r($arr);
echo "
";
}
$recordset = $db->Execute("select * from emp where empno>:emp",
array('emp' => 7900));
while ($arr = $recordset->FetchRow()) {
print_r($arr);
echo "
";
}
2. ADOdb Query Semantics
You can also query the database using the standard Microsoft ADO MoveNext( ) metaphor. The data array for the current row is stored in the fields property of the recordset object, $rs. MoveNext( ) offers the highest performance among all the techniques for iterating through a recordset:
$rs = $db->Execute("select * from emp where empno>:emp", array('emp' => 7900));
while (!$rs->EOF) {
print_r($rs->fields);
$rs->MoveNext();
}
And if you are interested in having the data returned in a 2-dimensional array, you can use:
$arr = $db->GetArray("select * from emp where empno>:emp", array('emp' => 7900));
Now to obtain only the first row as an array:
$arr = $db->GetRow("select * from emp where empno=:emp", array('emp' => 7900));
Or to retrieve only the first field of the first row:
$arr = $db->GetOne("select ename from emp where empno=:emp", array('emp' => 7900));
For easy pagination support, we provide the SelectLimit function. The following will perform a select query, limiting it to 100 rows, starting from row 201 (row 1 being the 1st row):
$offset = 200; $limitrows = 100;
$rs = $db->SelectLimit('select * from table', $limitrows, $offset);
The $offset parameter is optional.
Array Fetch Mode
When data is being returned in an array, you can choose the type of array the data is returned in.
1. Numeric indexes - use $connection->SetFetchMode(ADODB_FETCH_NUM).
2. Associative indexes - the keys of the array are the names of the fields (in upper-case). Use $connection->SetFetchMode(ADODB_FETCH_ASSOC).
3. Both numeric and associative indexes - use $connection->SetFetchMode(ADODB_FETCH_BOTH).
The default is ADODB_FETCH_BOTH for Oracle.
Caching
You can define a database cache directory using $ADODB_CACHE_DIR, and cache the results of frequently used queries that rarely change. This is particularly useful for SQL with complex where clauses and group-by's and order-by's. It is also good for relieving heavily-loaded database servers.
This example will cache the following select statement for 3600 seconds (1 hour):
$ADODB_CACHE_DIR = '/var/adodb/tmp';
$rs = $db->CacheExecute(3600, "select names from allcountries order by 1");
There are analogous CacheGetArray( ), CacheGetRow( ), CacheGetOne( ) and CacheSelectLimit( ) functions. The first parameter is the number of seconds to cache. You can also pass a bind array as a 3rd parameter (not shown above).
There is an alternative syntax for the caching functions. The first parameter is omitted, and you set the cacheSecs property of the connection object:
$ADODB_CACHE_DIR = '/var/adodb/tmp';
$connection->cacheSecs = 3600;
$rs = $connection->CacheExecute($sql, array('id' => 1));
3. Using Prepare( ) For Frequently Used Statements
Prepare( ) is for compiling frequently used SQL statement for reuse. For example, suppose we have a large array which needs to be inserted into an Oracle database. The following will result in a massive speedup in query execution (at least 20-40%), as the SQL statement only needs to be compiled once:
$stmt = $db->Prepare('insert into table (field1, field2) values (:f1, :f2)');
foreach ($arrayToInsert as $key => $value) {
$db->Execute($stmt, array('f1' => $key, 'f2' => $val);
}
4. Working With LOBs
Oracle treats data which is more than 4000 bytes in length specially. These are called Large Objects, or LOBs for short. Binary LOBs are BLOBs, and character LOBs are CLOBs. In most Oracle libraries, you need to do a lot of work to process LOBs, probably because Oracle designed it to work in systems with little memory. ADOdb tries to make things easy by assuming the LOB can fit into main memory.
ADOdb will transparently handle LOBs in select statements. The LOBs are automatically converted to PHP variables without any special coding.
For updating records with LOBs, the functions UpdateBlob( ) and UpdateClob( ) are provided. Here's a BLOB example. The parameters should be self-explanatory:
$ok = $db->Execute("insert into aTable (id, name, ablob)
values (aSequence.nextVal, 'Name', null)");
if (!$ok) return LogError($db->ErrorMsg());
# params: $tableName, $blobFieldName, $blobValue, $whereClause
$db->UpdateBlob('aTable', 'ablob', $blobValue, 'id=aSequence.currVal');
and the analogous CLOB example:
$ok = $db->Execute("insert into aTable (id, name, aclob)
values (aSequence.nextVal, 'Name', null)");
if (!$ok) return LogError($db->ErrorMsg());
$db->UpdateClob('aTable', 'aclob', $clobValue, 'id=aSequence.currVal');
Note that LogError( ) is a user-defined function, and not part of ADOdb.
Inserting LOBs is more complicated. Since ADOdb 4.55, we allow you to do this (assuming that the photo field is a BLOB, and we want to store $blob_data into this field, and the primary key is the id field):
$sql = "INSERT INTO photos ( ID, photo) ".
"VALUES ( :id, empty_blob() )".
" RETURNING photo INTO :xx";
$stmt = $db->PrepareSP($sql);
$db->InParameter($stmt, $id, 'id');
$blob = $db->InParameter($stmt, $blob_data, 'xx',-1, OCI_B_BLOB);
$db->StartTrans();
$ok = $db->Execute($stmt);
$db->CompleteTrans();
5. REF CURSORs
Oracle recordsets can be passed around as variables called REF Cursors. For example, in PL/SQL, we could define a function open_tab that returns a REF CURSOR in the first parameter:
TYPE TabType IS REF CURSOR RETURN TAB%ROWTYPE;
PROCEDURE open_tab (tabcursor IN OUT TabType,tablenames IN VARCHAR) IS
BEGIN
OPEN tabcursor FOR SELECT * FROM TAB WHERE tname LIKE tablenames;
END open_tab;
In ADOdb, we could access this REF Cursor using the ExecuteCursor() function. The following will find all table names that begin with 'A' in the current schema:
$rs = $db->ExecuteCursor("BEGIN open_tab(:refc,'A%'); END;",'refc');
while ($arr = $rs->FetchRow()) print_r($arr);
The first parameter is the PL/SQL statement, and the second parameter is the name of the REF Cursor.
6. In and Out Parameters
The following PL/SQL stored procedure requires an input variable, and returns a result into an output variable:
PROCEDURE data_out(input IN VARCHAR, output OUT VARCHAR) IS
BEGIN
output := 'I love '||input;
END;
The following ADOdb code allows you to call the stored procedure:
$stmt = $db->PrepareSP("BEGIN adodb.data_out(:a1, :a2); END;");
$input = 'Sophia Loren';
$db->InParameter($stmt,$input,'a1');
$db->OutParameter($stmt,$output,'a2');
$ok = $db->Execute($stmt);
if ($ok) echo ($output == 'I love Sophia Loren') ? 'OK' : 'Failed';
PrepareSP( ) is a special function that knows about bind parameters. The main limitation currently is that IN OUT parameters do not work.
Bind Parameters and REF CURSORs
We could also rewrite the REF CURSOR example to use InParameter (requires ADOdb 4.53 or later):
$stmt = $db->PrepareSP("BEGIN adodb.open_tab(:refc,:tabname); END;");
$input = 'A%';
$db->InParameter($stmt,$input,'tabname');
$rs = $db->ExecuteCursor($stmt,'refc');
while ($arr = $rs->FetchRow()) print_r($arr);
Bind Parameters and LOBs
You can also operate on LOBs. In this example, we have IN and OUT parameters using CLOBs.
$text = 'test test test';
$sql = "declare rs clob; begin :rs := lobinout(:sa0); end;";
$stmt = $conn -> PrepareSP($sql);
$conn -> InParameter($stmt,$text,'sa0', -1, OCI_B_CLOB); # -1 means variable length
$rs = '';
$conn -> OutParameter($stmt,$rs,'rs', -1, OCI_B_CLOB);
$conn -> Execute($stmt);
echo "return = ".$rs."
";
Similarly, you can use the constant OCI_B_BLOB to indicate that you are using BLOBs.
Reusing Bind Parameters with CURSOR_SHARING=FORCE
Many web programmers do not care to use bind parameters, and prefer to enter the SQL directly. So instead of:
$arr = $db->GetArray("select * from emp where empno>:emp", array('emp' => 7900));
They prefer entering the values inside the SQL:
$arr = $db->GetArray("select * from emp where empno>7900");
This reduces Oracle performance because Oracle will reuse compiled SQL which is identical to previously compiled SQL. The above example with the values inside the SQL is unlikely to be reused. As an optimization, from Oracle 8.1 onwards, you can set the following session parameter after you login:
ALTER SESSION SET CURSOR_SHARING=FORCE
This will force Oracle to convert all such variables (eg. the 7900 value) into constant bind parameters, improving SQL reuse.
More speedup tips.
7. Dates and Datetime in ADOdb
There are two things you need to know about dates in ADOdb.
First, to ensure cross-database compability, ADOdb assumes that dates are returned in ISO format (YYYY-MM-DD H24:MI:SS).
Secondly, since Oracle treats dates and datetime as the same data type, we decided not to display the time in the default date format. So on login, ADOdb will set the NLS_DATE_FORMAT to 'YYYY-MM-DD'. If you prefer to show the date and time by default, do this:
$db = NewADOConnection('oci8');
$db->NLS_DATE_FORMAT = 'RRRR-MM-DD HH24:MI:SS';
$db->Connect($tns, $user, $pwd);
Or execute:
$sql = "ALTER SESSION SET NLS_DATE_FORMAT = 'RRRR-MM-DD HH24:MI:SS'";
$db->Execute($sql);
If you are not concerned about date portability and do not use ADOdb's portability layer, you can use your preferred date format instead.
8. Database Portability Layer
ADOdb provides the following functions for portably generating SQL functions as strings to be merged into your SQL statements:
Function Description
DBDate($date) Pass in a UNIX timestamp or ISO date and it will convert it to a date string formatted for INSERT/UPDATE
DBTimeStamp($date) Pass in a UNIX timestamp or ISO date and it will convert it to a timestamp string formatted for INSERT/UPDATE
SQLDate($date, $fmt) Portably generate a date formatted using $fmt mask, for use in SELECT statements.
OffsetDate($date, $ndays) Portably generate a $date offset by $ndays.
Concat($s1, $s2, ...) Portably concatenate strings. Alternatively, for mssql use mssqlpo driver, which allows || operator.
IfNull($fld, $replaceNull) Returns a string that is the equivalent of MySQL IFNULL or Oracle NVL.
Param($name) Generates bind placeholders, using ? or named conventions as appropriate.
$db->sysDate Property that holds the SQL function that returns today's date
$db->sysTimeStamp Property that holds the SQL function that returns the current timestamp (date+time).
$db->concat_operator Property that holds the concatenation operator
$db->length Property that holds the name of the SQL strlen function.
$db->upperCase Property that holds the name of the SQL strtoupper function.
$db->random Property that holds the SQL to generate a random number between 0.00 and 1.00.
$db->substr Property that holds the name of the SQL substring function.
ADOdb also provides multiple oracle oci8 drivers for different scenarios:
Driver Name Description
oci805 Specifically for Oracle 8.0.5. This driver has a slower SelectLimit( ).
oci8 The default high performance driver. The keys of associative arrays returned in a recordset are upper-case.
oci8po The portable Oracle driver. Slightly slower than oci8. This driver uses ? instead of :bindvar for binding variables, which is the standard for other databases. Also the keys of associative arrays are in lower-case like other databases.
Here's an example of calling the oci8po driver. Note that the bind variables use question-mark:
$db = NewADOConnection('oci8po');
$db->Connect($tns, $user, $pwd);
$db->Execute("insert into atable (f1, f2) values (?,?)", array(12, 'abc'));
9. Connecting to Oracle
Before you can use ADOdb, you need to have the Oracle client installed and setup the oci8 extension. This extension comes pre-compiled for Windows (but you still need to enable it in the php.ini file). For information on compiling the oci8 extension for PHP and Apache on Unix, there is an excellent guide at oracle.com.
Should You Use Persistent Connections
One question that is frequently asked is should you use persistent connections to Oracle. Persistent connections allow PHP to recycle existing connections, reusing them after the previous web pages have completed. Non-persistent connections close automatically after the web page has completed. Persistent connections are faster because the cost of reconnecting is expensive, but there is additional resource overhead. As an alternative, Oracle allows you to pool and reuse server processes; this is called Shared Server (also known as MTS).
The author's benchmarks suggest that using non-persistent connections and the Shared Server configuration offer the best performance. If Shared Server is not an option, only then consider using persistent connections.
Connection Examples
Just in case you are having problems connecting to Oracle, here are some examples:
a. PHP and Oracle reside on the same machine, use default SID, with non-persistent connections:
$conn = NewADOConnection('oci8');
$conn->Connect(false, 'scott', 'tiger');
b. TNS Name defined in tnsnames.ora (or ONAMES or HOSTNAMES), eg. 'myTNS', using persistent connections:
$conn = NewADOConnection('oci8');
$conn->PConnect(false, 'scott', 'tiger', 'myTNS');
or
$conn->PConnect('myTNS', 'scott', 'tiger');
c. Host Address and SID
$conn->connectSID = true;
$conn->Connect('192.168.0.1', 'scott', 'tiger', 'SID');
d. Host Address and Service Name
$conn->Connect('192.168.0.1', 'scott', 'tiger', 'servicename');
e. Oracle connection string:
$cstr = "(DESCRIPTION=(ADDRESS=(PROTOCOL=TCP)(HOST=$host)(PORT=$port))
(CONNECT_DATA=(SID=$sid)))";
$conn->Connect($cstr, 'scott', 'tiger');
f. ADOdb data source names (dsn):
$dsn = 'oci8://user:pwd@tnsname/?persist'; # persist is optional
$conn = ADONewConnection($dsn); # no need for Connect/PConnect
$dsn = 'oci8://user:pwd@host/sid';
$conn = ADONewConnection($dsn);
$dsn = 'oci8://user:pwd@/'; # oracle on local machine
$conn = ADONewConnection($dsn);
With ADOdb data source names, you don't have to call Connect( ) or PConnect( ).
10. Error Checking
The examples in this article are easy to read but a bit simplistic because we ignore error-handling. Execute( ) and Connect( ) will return false on error. So a more realistic way to call Connect( ) and Execute( ) is:
function InvokeErrorHandler()
{
global $db; ## assume global
MyLogFunction($db->ErrorNo(), $db->ErrorMsg());
}
if (!$db->Connect($tns, $usr, $pwd)) InvokeErrorHandler();
$rs = $db->Execute("select * from emp where empno>:emp order by empno",
array('emp' => 7900));
if (!$rs) return InvokeErrorHandler();
while ($arr = $rs->FetchRow()) {
print_r($arr);
echo "
";
}
You can retrieve the error message and error number of the last SQL statement executed from ErrorMsg( ) and ErrorNo( ). You can also define a custom error handler function. ADOdb also supports throwing exceptions in PHP5.
Handling Large Recordsets (added 27 May 2005)
The oci8 driver does not support counting the number of records returned in a SELECT statement, so the function RecordCount() is emulated when the global variable $ADODB_COUNTRECS is set to true, which is the default. We emulate this by buffering all the records. This can take up large amounts of memory for big recordsets. Set $ADODB_COUNTRECS to false for the best performance.
This variable is checked every time a query is executed, so you can selectively choose which recordsets to count.
Friday, September 14, 2007
Cara Instalasi XAMPP
XAMPP merupakan sebuah paket instalasi untuk PHP, APACHE dan MySQL. Dengan menggunakan XAMPP, kita tidak perlu lagi repot menginstall ketiga software itu secara terpisah. XAMPP dapat di download di http://www.apachefriends.org/en/index.html. Berikut ini adalah cara menginstall XAMPP.
1. Jalankan file xampp-win32-1.4.12-installer.exe (atau versi lainnya)
2. Kemudian akan tampil pilihan untuk memilih bahasa ketika proses instalasi berjalan. Silakan pilih bahasa Indonesian atau English, kecuali anda menguasai bahasa lainnya. Pada contoh ini saya memilih bahasa Indonesian karena saya cinta bahasa Indonesia. Memilih bahasa

3. Proses instalasi akan dimulai. Klik Maju untuk memulainya. Mulai Instalasi

4. Akan muncul lisensi software. Silahkan membacanya jika anda mau, tetapi saya lebih suka untuk tidak membacanya karena terlalu banyak. Klik Saya Setuju untuk melanjutkan.Lisensi Software

5. Selanjutnya silakan anda pilih lokasi install untuk XAMPP. Kemudian klik install

6. Tunggu beberapa saat sampai proses instalasi selesai.Tunggu sebentar

7. Instalasi selesai

8. Sampai tahap ini, berarti kita sudah menginstal XAMPP. Itu berarti kita sudah selesai menginstall PHP, APACHE dan MYSQL. Langkah selanjutnya adalah menjalankan servicenya.
9. Jalankan XAMPP Control Panel yang ada di desktop. Atau anda juga dapat menjalankan XAMPP Control Panel dari menu Start -> All Programs -> apachefriends -> xampp -> xampp control panel. xampp control panel

10. Nyalakan Apache dan Mysql dengan mengklik tombol Start. Buka web browser anda, lalu ketikkan http://localhost. Jika tampilannya seperti di bawah ini, maka apache sudah terinstall dengan benar.

11. Sekedar informasi saja, document root milik XAMPP terletak pada folder E:\Program Files\apachefriends\xampp\htdocs. Hal ini disebabkan karena saya menginstall XAMPP pada folder E:\Program Files\apachefriends.
1. Jalankan file xampp-win32-1.4.12-installer.exe (atau versi lainnya)
2. Kemudian akan tampil pilihan untuk memilih bahasa ketika proses instalasi berjalan. Silakan pilih bahasa Indonesian atau English, kecuali anda menguasai bahasa lainnya. Pada contoh ini saya memilih bahasa Indonesian karena saya cinta bahasa Indonesia. Memilih bahasa
3. Proses instalasi akan dimulai. Klik Maju untuk memulainya. Mulai Instalasi
4. Akan muncul lisensi software. Silahkan membacanya jika anda mau, tetapi saya lebih suka untuk tidak membacanya karena terlalu banyak. Klik Saya Setuju untuk melanjutkan.Lisensi Software
5. Selanjutnya silakan anda pilih lokasi install untuk XAMPP. Kemudian klik install
6. Tunggu beberapa saat sampai proses instalasi selesai.Tunggu sebentar
7. Instalasi selesai
8. Sampai tahap ini, berarti kita sudah menginstal XAMPP. Itu berarti kita sudah selesai menginstall PHP, APACHE dan MYSQL. Langkah selanjutnya adalah menjalankan servicenya.
9. Jalankan XAMPP Control Panel yang ada di desktop. Atau anda juga dapat menjalankan XAMPP Control Panel dari menu Start -> All Programs -> apachefriends -> xampp -> xampp control panel. xampp control panel
10. Nyalakan Apache dan Mysql dengan mengklik tombol Start. Buka web browser anda, lalu ketikkan http://localhost. Jika tampilannya seperti di bawah ini, maka apache sudah terinstall dengan benar.
11. Sekedar informasi saja, document root milik XAMPP terletak pada folder E:\Program Files\apachefriends\xampp\htdocs. Hal ini disebabkan karena saya menginstall XAMPP pada folder E:\Program Files\apachefriends.
Thursday, September 13, 2007
PhpMyAdmin
Phpmyadmin adalah suatu aplikasi yang dibuat dengan bahasa pemrograman PHP yang ditujukan untuk pengelolaan basis data MySQL melalui Internet. Fungsi phpmyadmin sama dengan fungsi software lain seperti SQLYOG dan MySQLFront. Hanya saja PhpMyAdmin adalah free software. Sebelum mengikuti tutorial ini lebih lanjut, ada baiknya anda mendownload dulu phpmyadmin.
Cara Menggunakan Phpmyadmin
1. Pastikan Apache, PHP dan MySQL sudah terinstall di komputer Anda. Copy file phpMyAdmin-2.5.6.zip ke dalam folder di mana anda menyimpan file php (dalam Document Root)
2. Extract file tersebut sehingga akan terbentuk sebuah folder bernama phpMyAdmin-2.5.6
3. Bukalah web browser dan ketikkan http://localhost, lalu carilah folder tersebut.
Jika web browser anda menampilkan halaman sbb, maka anda harus mengatur / konfigurasi username dan password mysql di phpmyadmin terlebih dahulu.
4. Akan tetapi jika tampilannya sebagai berikut, berarti anda tidak perlu melakukan pengaturan / konfigurasi username dan password mysql di phpmyadmin
5. Jika tampilannya seperti pada gambar 3, maka anda harus melakukan konfigurasi username dan password mysqldi phpmyadmin. Caranya adalah buka folder phpMyAdmin-2.5.6 melalui windows explorer. Kemudian bukalah file config.inc.php (boleh menggunakan Dreamweaver maupun notepad).
6. Ubahlah beberapa settingan sbb :
di baris ke 69 : $cfg[’Servers’][$i][’host’] = ‘localhost’;
$cfg[’Servers’][$i][’host’] berisi host atau komputer tempat database mysql berada. Isi dengan localhost jika database mysql berada di komputer anda
Di baris ke-70 : $cfg[’Servers’][$i][’port’] = ‘’;
$cfg[’Servers’][$i][’port’] adalah port yang digunakan mysql. Kosongkan jika mysql anda menggunakan port standar (3306)
Di baris ke-83 : $cfg[’Servers’][$i][’user’] = ‘root’;
$cfg[’Servers’][$i][’user’] adalah user yang digunakan untuk koneksi ke mysql
Di baris ke-84 : $cfg[’Servers’][$i][’password’] = ‘’;
$cfg[’Servers’][$i][’password’] adalah password yang digunakan untuk koneksi ke mysql
Wednesday, September 5, 2007
Blog Is ...
From Wikipedia, the free encyclopedia
For other uses, see Blog (disambiguation).
“Blogger” redirects here. For the blog publishing system, see Blogger (service).
A blog (a portmanteau of web log) is a website where entries are written in chronological order and commonly displayed in reverse chronological order. "Blog" can also be used as a verb, meaning to maintain or add content to a blog.
Blogs provide commentary or news on a particular subject such as food, politics, or local news; some function as more personal online diaries. A typical blog combines text, images, and links to other blogs, web pages, and other media related to its topic. The ability for readers to leave comments in an interactive format is an important part of many blogs. Most blogs are primarily textual, although some focus on art (artlog), photographs (photoblog), sketchblog, videos (vlog), music (MP3 blog), audio (podcasting) or sexual topics (Adult blog), and are part of a wider network of social media. Micro-blogging is another type of blogging which consists of blogs with very short posts.
In May 2007, blog search engine Technorati was tracking more than 71 million blogs
Monday, August 20, 2007
Membuat Halaman Login Dengan PHP, MySQL, AJAX, Script.aculo.us dan Prototype.js (bag 2)
Oke, sekarang akan saya lanjutkan tutorial yang kedua. Saya anggap Anda sudah mendownload script.acyulo.us dan prototype.js. Kalo belum, silakan anda download lebih dahulu.
Silakan buka file login.php dan ubah menjadi sebagai berikut.
login.php
buat juga CSS nya dan simpan dengan nama style.css
sampai sejauh ini, kita udah membuat 2 buah file, yaitu login.php dan style.css, selanjutnya kita harus membuat satu file lagi yaitu ajax.php yang akan digunakan untuk mengecek login. Kita juga butuh sebuah database yang berisikan username dan password. Tunggu tutorial bagian ke-3 ya....
Thursday, August 16, 2007
Membuat Halaman Login Dengan PHP, MySQL, AJAX, Script.aculo.us dan Prototype.js (bag 1)
Dalam tutorial kali ini, saya akan menjelaskan bagaimana cara membuat halaman login dengan PHP, MySQL, AJAX, ScriptAculous dan Prototype.js. Untuk mengikuti tutorial ini, Anda sebaiknya sudah mengerti konsep webserver, PHP, dan database MySQL. Kalo belum, sebaiknya Anda mempelajarinya terlebih dahulu. Anda juga harus mengerti AJAX, ScriptAculous dan Prototype.js. Kalo belum mengerti, sebaiknya baca tutorialnya di sini dulu.
Oke, kita mulai saja ya... Pertama Anda harus menyiapkan sebuah halaman HTML untuk login. Kita beri nama "login.php".
saya rasa untuk tag HTML tidak perlu saya jelaskan lagi. Itu adalah tag HTML untuk membuat halaman login yang terdiri dari textbox username dan password. Dalam HTML di atas juga saya buatkan sebuah div untuk menampung hasil error ketika proses login berlangsung. Untuk mengikuti tutorial login bagian ke2, sebaiknya Anda download dulu library prototype.js dan scriptaculous. Tunggu tutorial bagian keduanya ya....
Thursday, August 2, 2007
The Meaning Of Tutorial
Based on wiki, the meaning of tutorial is :
Itu adalah arti dari kata tutorial yang ada di wiki. Intinya karena ini adalah blog yang akan berisi tutorial, maka mulai saat ini saya akan mencoba untuk memberikan beberapa tutorial yang berguna. Sedangkan blog saya yang satu lagi, hanya akan berisi tentang lirik lagu, kehidupan saya, motivasi dan renungan.
Kira-kira tutorial apa ya yang akan ditulis di sini? Atau ada rekan-rekan yang ingin request tutorial, silakan berikan komentarnya......
is a document, software, or other media created for the purpose of instruction for any of a wide variety of tasks.
Tutorials usually have the following characteristics:
* A presentation of content, usually with an example or examples, often broken up into discrete modules or sections.
* Some method of review that reinforces or tests understanding of the content in the related module or section.
* A transition to additional modules or sections that builds on the instructions already provided. Tutorials can be linear or branching.
While many writers refer to a mere list of instructions or tips as a tutorial, this usage can be misleading.
In computer based education, a tutorial is a computer program whose purpose it is to assist users in learning how to use (parts of) a software product such as an office suite or any other application, operating system interface, programming tool, or game. There are two kinds of software tutorials: movie tutorials that you watch, and interactive tutorials where you follow on-screen instructions (and in some cases watch short instruction movies), whereupon you do the tutorial exercises and get feedback depending on your actions. Some computer based tutorials can also be put up on the web.
Itu adalah arti dari kata tutorial yang ada di wiki. Intinya karena ini adalah blog yang akan berisi tutorial, maka mulai saat ini saya akan mencoba untuk memberikan beberapa tutorial yang berguna. Sedangkan blog saya yang satu lagi, hanya akan berisi tentang lirik lagu, kehidupan saya, motivasi dan renungan.
Kira-kira tutorial apa ya yang akan ditulis di sini? Atau ada rekan-rekan yang ingin request tutorial, silakan berikan komentarnya......
Sunday, July 22, 2007
How To Connect PHP - MySQL
In this post, I will explain you about PHP and MySQL. You can use PHP with MySQL database. You only need a simple script to connect PHP- MySQL.
1. mysql_connect() -- Open a connection to a MySQL Server
This function need several parameters. For example :
mysql_connect("localhost","root","12345")
notes : localhost --> the mysql server name
root --> the mysql username
12345 --> the mysql password
example : $link = mysql_connect("localhost", "mysql_user", "mysql_password")
or die("Could not connect");
2. mysql_select_db() --> Select a MySQL database
You need database name for this function
example : mysql_select_db("mysql")
notes : mysql is the database name is mysql database
3. mysql_query() --> Send a MySQL query
example : $result = mysql_query("SELECT * WHERE user='jhon'")
or die("Invalid query");
notes : SELECT * WHERE user='jhon' is query for mysql.
Monday, May 21, 2007
Date Function on PHP
to display the time and date in PHP, we can use date function. This function have several parameter. example
<?
date('d-m-y h:i:s')
?>
this syntax will return 21-05-2007 15:25:32.
For other parameters, please try to change the example above.
<?
date('d-m-y h:i:s')
?>
this syntax will return 21-05-2007 15:25:32.
For other parameters, please try to change the example above.
| format character | Description | Example returned values |
|---|---|---|
| a | Lowercase Ante meridiem and Post meridiem | am or pm |
| A | Uppercase Ante meridiem and Post meridiem | AM or PM |
| B | Swatch Internet time | 000 through 999 |
| d | Day of the month, 2 digits with leading zeros | 01 to 31 |
| D | A textual representation of a day, three letters | Mon through Sun |
| F | A full textual representation of a month, such as January or March | January through December |
| g | 12-hour format of an hour without leading zeros | 1 through 12 |
| G | 24-hour format of an hour without leading zeros | 0 through 23 |
| h | 12-hour format of an hour with leading zeros | 01 through 12 |
| H | 24-hour format of an hour with leading zeros | 00 through 23 |
| i | Minutes with leading zeros | 00 to 59 |
| I (capital i) | Whether or not the date is in daylights savings time | 1 if Daylight Savings Time, 0 otherwise. |
| j | Day of the month without leading zeros | 1 to 31 |
| l (lowercase 'L') | A full textual representation of the day of the week | Sunday through Saturday |
| L | Whether it's a leap year | 1 if it is a leap year, 0 otherwise. |
| m | Numeric representation of a month, with leading zeros | 01 through 12 |
| M | A short textual representation of a month, three letters | Jan through Dec |
| n | Numeric representation of a month, without leading zeros | 1 through 12 |
| O | Difference to Greenwich time (GMT) in hours | Example: +0200 |
| r | RFC 822 formatted date | Example: Thu, 21 Dec 2000 16:01:07 +0200 |
| s | Seconds, with leading zeros | 00 through 59 |
| S | English ordinal suffix for the day of the month, 2 characters | st, nd, rd or th. Works well with j |
| t | Number of days in the given month | 28 through 31 |
| T | Timezone setting of this machine | Examples: EST, MDT ... |
| U | Seconds since the Unix Epoch (January 1 1970 00:00:00 GMT) | See also time() |
| w | Numeric representation of the day of the week | 0 (for Sunday) through 6 (for Saturday) |
| W | ISO-8601 week number of year, weeks starting on Monday (added in PHP 4.1.0) | Example: 42 (the 42nd week in the year) |
| Y | A full numeric representation of a year, 4 digits | Examples: 1999 or 2003 |
| y | A two digit representation of a year | Examples: 99 or 03 |
| z | The day of the year | 0 through 366 |
| Z | Timezone offset in seconds. The offset for timezones west of UTC is always negative, and for those east of UTC is always positive. | -43200 through 43200 |
Wednesday, April 25, 2007
How to Create button in photoshop
1. Open your photoshop program
2. Make new file with size 100 pixels x 20 pixels and transparent background
3. Click Rectangle Tool and select the style and colour do you want.
4. Fill the layer with rectangle tool

5. Select Type Tool and type the text in the button
6. Move the text to center. Select Type Tool. Select > All. Then click Align Vertical Center and Align Horizontal Center
7. Save your image. File > Save
8. Save for web. File > Save For Web
2. Make new file with size 100 pixels x 20 pixels and transparent background
3. Click Rectangle Tool and select the style and colour do you want.

4. Fill the layer with rectangle tool

5. Select Type Tool and type the text in the button
6. Move the text to center. Select Type Tool. Select > All. Then click Align Vertical Center and Align Horizontal Center

7. Save your image. File > Save
8. Save for web. File > Save For Web
Friday, April 20, 2007
This is my another blog
This is my another blog. I just try to write my blog in English. But my English is not very good.
My primary blog is http://away.blogsome.com.
My primary blog is http://away.blogsome.com.
Subscribe to:
Posts (Atom)